Thursday, March 12, 2009

Creating a Poll in Joomla 1.5

Creating a Poll in Joomla 1.5

Let's place a poll in order to find out what visitors think about your new site. Follow the steps below to add a poll to your Joomla site:

Step 1. From the top menu in the Joomla admin area choose Components -> Polls:
Step 2. Click [New] from the top right menu. Let's call the poll: "What do you think about our site?".

Step 3. In the left menu we will list the poll options: "Great", "Not bad", "Awful". Step 4. To save the new poll, click on [Save] from the top right menu.

Step 5. Now the poll has to be made public, i.e. to be published. For this purpose click on Extensions -> Module Manager from the top menu: Step 6. Choose [New] from the top - right menu, find Poll from the options listed and check it. Step 7. Click on "Next" from the top right menu.

Step 8. Set the poll title to: What do you think about our new site?

Step 9. Set "Show title" to "No".

Step 10. From the right box, Module Parameters > Poll select the poll called "What do you think about our new site".
Step 11. Click on [Save] from the top right menu and you will have the poll published on your frontpage.

Read more...

How to add the Contact us page to the menu?

How to add the Contact us page to the menu?

Step 1. Let's add a link to the "Contact us" page. For this purpose click on the [New] icon from the top menu and choose:Internal Link -> Contacts -> Category -> Standard Contact Layout.
Step 2. Fill the information about your new menu item "Contact us" and click [Save].

Read more...

How to set a page as default?

How to set a page as default?

While you are still in the Menu Item Manager, let's set your page "About us" as default.

Step 1. For this purpose check its radio button and click on [Default] from the top menu:
Step 2. (Optionally) You can remove the default link "Home" because we will not need it.

Read more...

Creating a website with Joomla 1.5: Links

Creating a website with Joomla 1.5: Links

In this tutorial we will show you how to link your articles to your menus. After reading this tutorial you will be able to add new items to your menus and expand your website with different sections.
Linking Articles to the Menu

In order to make your pages accessible for your visitors, you should link them in the site menu. To do this, follow the steps below.

Step 1. From the admin panel, go to Menus -> Main Menu*.
Step 2. Delete all default links. For this purpose check the first radio button to select all links and click on Trash. (There will be a warning "You cannot trash the default menu item" which can be safely disregarded)

Step 3. Let's add links to your articles and the "Contact us" page. For this purpose click on [New] from the top-left menu and select the item type. In our case it will be Internal link - Article - Article Layout: Step 4. Fill in the information about the links. Let's call the link "About us". Then from the left Parameters - Basic click on [Select]: Step 5. A box with all your pages will appear and you should click on "About us":Step 6. Save the link by clicking on [Save] from the top-right menu.

Read more...

Creating a website with Joomla 1.5: Contact us page

Creating a website with Joomla 1.5: Contact us page

Receiving feedback from the website visitors is important for every webmaster. In this tutorial we will show you how to create a Contact Us page. It is an easy and convenient way to get in touch with the people that browse your website. For additional information on how to create your Joomla 1.5 website, you can check our tutorial on Creating a website with Joomla 1.5.
Creating a Contact us Page

Let's add a "Contact us" page with an online mail form to your Joomla website.

Step 1. First you need to create a new Contacts Category. For this purpose go to Components -> Contacts -> Categories:

Components, Contacts, Categrories
Step 2. Click on [New]. Since we plan to have a simple Contact Us page, you should create only one single category called again "General" and then click on [Save].
Step 3. Go to Components -> Contacts -> Contacts:
Step 4. Click on [New] and fill in the information. You have to make sure the email you enter is valid since all the mails you receive via this contact form will be sent to it.

Step 5. In order to avoid having your contact's name duplicated later, from the right box "Contacts parameters" check the button Hide next to "Name".

Step 6. Leave the rest of the default options unchanged and click on [Save] from the top-right menu.
Your contact form will be saved and you will be able to publish it on your site. More information on how to do this can be found on the next page.

Read more...

Wednesday, March 11, 2009

Creating articles in Joomla

Creating articles in Joomla

If you have installed Joomla through Fantastico or from source with the sample data, you will already have a few articles created and published. You can take a look at how they are written and organized in order to get used to managing your articles. To see them go to Content > Article Manager from the top admin menu.
There you will see several articles listed. Once you click an article link, you will enter the Edit mode for the article. From the Edit menu you can modify the article's title, text, etc.

Before building your first article, let's remove all default articles to avoid confusion. For this purpose go back to Content > Article Manager from the top admin menu.

Then select all articles by checking the first radio button in the column and click on the [Trash] button from the top admin menu.Now let's create your first article which we'll call "About us".

Step 1. From the top admin menu click on [New]
Step 2. Then make the following changes in the corresponding fields:

Title: About us
Alias: (leave it blank)
Section: Uncategorized
Category: Uncategorized
Published: Yes (If the article is not published, it will not be shown to your visitors. It will remain only as a draft.)
Frontpage: Yes (This will allow it to appear on the first page of your site.)

In the main text field write some information about your company...

Step 3. You can also insert your company's logo. For this purpose click on the image icon at the bottom of the page: Step 4. Since your logo is not uploaded yet, click on the [Upload file] link to upload it. Browse your local computer and find the logo image. Click on [Start Upload] to upload it.Step 5. You will see a confirmation that the file has been successfully uploaded. Now it can be found in the upper part of the window along with the default Joomla images. Click on logo.png (or whatever the name of your logo is) to select it and then on [Insert] to insert it in your article.

The logo's position in the article can be easily adjusted by dragging the image.

Step 6. The last step is to save this article by clicking on the [Save] button.

Read more...

Logging into the Joomla admin area

Logging into the Joomla admin area

After having Joomla 1.5 installed on your account, you can begin adding your content. In this example we'll assume that your domain is your_domain_name.com. Thus the Joomla's admin panel will be accessible at:

http://your_domain_name.com/administrator

Please make sure you change your_domain_name.com to your actual domain name when following this tutorial.

To log in to your Joomla admin area, enter your login information in the Joomla! Administration Login screen:

Read more...

Joomla Layout

Joomla Layout

This tutorial will explain the different parts of the Joomla layout. If you don't have a Joomla website installed yet, you can check our tutorial on How to install Joomla. You can also get a free professional Joomla installation with your Joomla Hosting account at SiteGround.com.
How to change the Joomla Frontpage Layout?

The layout and content positioning of your Joomla website is defined by the Joomla template you currently use. Below you can see a screenshot that represents the basic items,added by the default Joomla template. You will find a short explanation of each item under the image. This will help you understand better the structure and key concepts of a Joomla website layout and how to change it.

The available positions in Joomla are defined by the template you are using. In this tutorial we will show the positions 1-10 in one of Joomla's default templates which is included in the official installation package. To change the position of a certain module, you can access it from the Extensions -> Module Manager page and then change its "Position" setting. Some of the most commonly used position names are top, user1 to user6, left, right, header, footer, breadcrumb, and newsflash.

1. In the "top" position of the Joomla website the "Banners" and "Newsflash" modules are placed by default.

The Banner module allows you to upload images that link to a desired URL. You can define your banners from Components -> Banners and then display the selected items by publishing the "Banners" module from the Extensions -> Module Manager page in your Joomla administrative area.

The Newsflash module displays a single random article, or a number of articles in a horizontal or vertical configuration. From your Joomla administration area you can select a category of articles that will be displayed by this module.

2. The "Top menu" module is published into the "user3" position by default. You can easily create and manage menus from the Menus -> Menus Manager page. You can then set your "Top menu" module to display the menu you have just created.

3. The "Breadcrumbs" module is placed into the "breadcrumb" position. It is a convenient navigation method which displays the current page you are on and the full "path" to it. If you are in a page called "Sample Page" that is under the main menu, the "Breadcrumbs" will display Home -> Sample Page. Using Breadcrumbs is very useful especially when you have multi-level menus.

4. The "Search" module is published in the "user4" position of the template. It gives your users the option to search within the content of your website.

5. Several modules are published into the "left" position of the template. In this position you can publish vertical menus, login forms and many other modules depending on your particular needs.

6. The "Latest News" module is published into the "user1" position of the template. It displays the most recently added articles from the selected category or from all categories. In addition, you can specify the number of displayed articles depending on your preferences.

7. The "Popular" module is published into the "user2" position of the template. It will display a selected number of articles that are visited the most. You can either select a category from which the articles will be displayed or you can set the module to display the most visited articles in the entire site.

8. This is the main part of your website. Here are the newest articles you have set to be displayed on the front page.

9. A "Polls" module is published into the "right" position of the template. You can create the actual polls from the Components -> Polls page in the administrative back-end of your Joomla application. Once you have created your Polls, you can choose which one to be displayed on your website by editing the preferences of the "Polls" module from the "Module manager".

10. "Banners" and "Footer" modules are displayed in the "footer" position of the template. You can use the "Footer" module to display useful links, your copyright and other useful information at the bottom of your page.

In the SiteGround Joomla templates Gallery you can find a variety of free Joomla templates with different layouts and themes! Here are instructions on how to change Joomla templates or create a basic Joomla template yourself.

Read more...

Monday, March 9, 2009

Joomla 1.5 Manual Installation

Joomla 1.5 Manual Installation

This tutorial will show you how to install Joomla manually. Alternatively, you can install Joomla using an Auto-Installer tool like Fantastico. You can also get a free professional Joomla installation with your Joomla Hosting account at SiteGround.com.
How to install Joomla 1.5 manually?

To install Joomla 1.5 manually follow the steps below:

Step 1. Create a MySQL database and add a new user to it. This can be done easily with cPanel by following the MySQL database tutorial.

In case you are not using cPanel you can refer to the MySQL manual on creating databases and adding users to it.

Step 2. Create a folder called upload on your computer.

Step 3. Go to the Joomla download page. Download the .zip file with the latest version to the upload folder and extract it there.

Step 4. Upload all the content from upload to the directory on the server where Joomla 1.5 will be installed

Step 5. Open the URL of the newly uploaded Joomla files. This will be either http://your_domain_name.com or a subdirectory such as http://your_domain_name.com/example.

Step 6. You will be redirected to the Joomla installation page:On the first page of the installation you will be able to choose the Language for the installation.

Important The selected language will be valid only for the installation process. Once installed Joomla will be back in English.

We recommend selecting "English" in order to follow easier the next steps from the tutorial.

Step 7. Joomla will perform a pre-installation check of the system environment. Failing to meet a requirement or recommendation may cause functional and security problems later.

Here is a screenshot of all Joomla 1.5 requirements met on a standard SiteGround hosting account:
Step 8. Once you make sure all requirements are met, click on the [Next] button from the top right menu.

Step 9. Next you will have to accept Joomla's license and click on [Next] to continue.

Step 10. The following page will ask about the MySQL details for the new Joomla 1.5 installation.

Here are some example entries and explanations for these fields in case you have difficulties understanding exactly what information you should enter: Step 11. Next you will have to configure your File Transfer Protocol (FTP). Leave it to the default settings and just click [Next] from the top right menu.

Step 12. From the page that appears you will be able to complete the final Joomla 1.5 settings specifying your email and specifying the admin password. Click on [Next] to proceed.In our example we will not use the option Install Sample Data because it may cause confusion and require time to remove all the data populated later.

Step 13. In the last page of the installation wizard you will receive a confirmation that Joomla has been successfully installed.

Before being able to access your new Joomla 1.5 you must delete the installation directory. For this purpose use FTP as described in Step 3.

Well done! Your Joomla website is now installed.

If you would like to learn more about the options the manual Joomla installation offers, please contact your SiteGround support team. Our technical team is expert in Joomla related questions and able to build the perfect environment for running your Joomla 1.5 website.

Read more...

Joomla 1.5 Installation through Fantastico

Joomla 1.5 Installation through Fantastico

In this section you will learn how to install Joomla 1.5 through the Fantastico Autoinstaller. If you don't have Fantastico or you prefer to install Joomla 1.5 manually, you can check our tutorial on how to install Joomla 1.5 manually.

To start with the installation log into your cPanel and click the Fantastico De Luxe icon.

Find the Joomla 1.5 link on the left side of the screen and click it.Then click New Installation.In the following form you will have to type in some informations about your future Joomla website.
You will have to specily the following information:

* Install in directory - this determines the address where your Joomla installation will be accessible at. If you want to use Joomla for your home page (e.g. www.yourdomainname.com) just leave this field blank.
* Admin access data - the username and password for accessing the administration panel of your Joomla installation.
* Admin e-mail - your e-mail address
* Admin full name - your full name
* Site Name - the name of your website that will be displayed on the front page
* Install Sample Data? - whether sample data should be installed to your Joomla. The sample data includes sample menu items and articles. If you are new to Joomla, we strongly advise you to install the sample data.


Once you have filled in the form, proceed by clicking on the Install Joomla 1.5 button. You will be asked to confirm the installation on the next page.

At the end of the installation you will receive information on how to login to your administration panel. You should bookmark the address of the administrator panel (e.g. www.yourdomainname.com/administrator) and remember your login credentials.

If you experience problems with the installation of your Joomla website, do not hesitate to contact your SiteGround support team. With you SiteGround Hosting account you get Free and Professional Joomla Installation, and within minutes you will have a fully functional and running Joomla website.

Read more...

Sunday, March 8, 2009

Joomla 1.5 Tutorial

Joomla 1.5 Tutorial

This Joomla tutorials collection is dedicated to showing you the basics of the Joomla 1.5 CMS. After reading it, you will be able to create a fully-functional website with Joomla in just few minutes. If you don't have a Joomla website yet, you can sign up here for a Joomla hosting account and get a free Joomla 1.5 installation!
Why use Joomla?

Joomla 1.5 is one of the most popular content management systems (CMS) you can use to easily create and manage your website. Even if you have little or no webmaster knowledge at all, Joomla will be just the right tool for you! Using Joomla you can set up very fast a website with a professional appearance, choose between appealing templates, create articles, add contact forms, polls, counter, allow user registrations, install plugins for additional functionality etc. And the best of all Joomla is absolutely free (GNU / GPL license).
This Joomla tutorial covers the following topics:

* How to install Joomla via Fantastico
* How to install Joomla manually
* How to customize the layout of your Joomla website
* How to create articles in Joomla
* How to create a Contact us page in Joomla
* How to link articles to the Joomla Menu
* How to create a Poll in Joomla 1.5
* How to create search engine friendly URLs
* How to add a counter in Joomla
* Joomla extension types
* How to install extensions to your Joomla website
* How to change Joomla templates
* How to create a simple Joomla 1.5 template
* How to secure your Joomla website
* How to create a backup of Joomla 1.5
* How to upgrade Joomla 1.5 to the latest stable version
* How to upgrade from Joomla 1.0 to Joomla 1.5
* How to fix the most common Joomla 1.5 issues
* How to convert a static website to Joomla

Read more...

upgrade from Joomla 1.0.x to Joomla 1.5?

How to upgrade from Joomla 1.0.x to Joomla 1.5?

Below we will show you how to upgrade from Joomla 1.0.x to Joomla 1.5.x.

Important Note that it is highly recommended to backup your existing Joomla web site before you proceed with the migration process.


ImportantThe Joomla upgrade to 1.5 will preserve ONLY the content of your Joomla 1.0.x. No components/modules/plugins/templates you have will be available in the upgraded Joomla 1.5.

Step 1: Install the Migrator component

The first step is to install the Migrator component to your existing Joomla web site. You can download the Migrator component here.
Once you have installed the Migrator component, you will be able to access it from the Components menu > Migrator.

The migrator component allows you to migrate your current Joomla 1.0.x data to the Joomla 1.5 database format.

Step 2: Create Migration SQL File

To proceed with the database migration click the Create Migration SQL File button located at the bottom of the Migrator component page:
The next step is to download the extracted SQL from your 1.0.x Joomla:
You can now download your SQL dump by clicking on the Download link available on the right section of the page and upload it into your Joomla! 1.5 installation. Later, when importing this SQL file into your 1.5 installation, make sure to select Load Migration Script and use the prefix '_jos' (by default).

Step 3: Perform a clean Joomla 1.5 installation

Next you should perform a manual Joomla 1.5 installation. For the purpose of this tutorial let's install Joomla 1.5 in a folder called dev.

Download the latest Joomla 1.5 package from the official website and extract it in the dev folder.

Open the dev folder by going to http://www.your-website.com/dev. You will see the Joomla start installation screen. Select your language, you should already have a database and user to fill them in.

Proceed with the installation further untill you reach Step 6: Configuration:
Fill the name of your web site, your admin e-mail and password details.

Important The key part here is to choose the Load Migration Script option:Fill the old table prefix _jos and leave the encoding unchanged unless needed and you are familiar with this option.

By clicking on the [Browse] button you should select the Joomla 1.0.x migration dump you downloaded earlier.

Important Make sure to check the This script is a Joomla! 1.0 migration script. check box as well.

Proceed by clicking on the [Upload and execute] button.

Once the data is imported you should see the following screen:Click on the [Next] button near to the upper right corner.

Important You need to completely remove the installation directory.Now when you open the front end of your newly installed Joomla 1.5 you will see all the articles from the previous Joomla imported.

Read more...

Friday, March 6, 2009

Joomla Upgrade

Joomla Upgrade

Important We recommend that you backup your Joomla before starting any upgrading procedures. Please, find here how to backup your Joomla files and database.

If you have used Fantastico for installing your Joomla, you will be able to upgrade it from there too. For this purpose check regularly your Fantastico's page for important notices. It will inform you about the available upgrade and guide you through the simple and intuitive process. SiteGround updates all its Fantastico installations every day to ensure our customers always use the latest application upgrades.

In some cases you will have to upgrade your Joomla manually. This is recommended when you have heavily modified your Joomla system and / or you have not used Fantastico to install it.

Manually upgrading from any version of Joomla 1.0.x to 1.0.XX, simply involves overwriting the outdated Joomla files. For this purpose Joomla provides upgrade patches for all of its previous versions to the latest one. You can find here the patch for your installation and make sure you download the one with .zip extension.

After you have downloaded the Patch Package to your local computer please use the cPanel -> File Manager to upload it to the installation directory of your Joomla. To do so, you need to:

Step 1: Open your cPanel -> File Manager and navigate to the installation folder of your Joomla application. Then click on the [Upload Files] button.
Step 2: Then browse trough your files and select the Patch Package from your local computer and click Upload.

Step 3: After this, please click on the Patch Package file in the File Manager. You need to extract the archive file using the Extract function. Please click on it and the files will be extracted upgrading your Joomla to the latest version. The path where the patch should be extracted is the root directory of your Joomla installation.

Well done! Your Joomla is now upgraded!

Important In some cases the upgrade may corrupt additionally added components and modules on your Joomla. In this case you will have to re-install them

Read more...

Gallery and Joomla CMS

Gallery and Joomla CMS

Gallery can be installed separately as a component in Joomla CMS. This is the easiest way to integrate the two applications. The files for the integration can be found here:

http://joomlacode.org/gf/project/gallery2_bridge/frs/

Before proceeding with the Gallery2 component installation, you should install the JoomlaLib component, wich can be downloaded from:

http://joomlacode.org/gf/download/frsrelease/4490/10193/com_joomlalib_1_3_1.zip

Then you will just need to download the Gallery2 component and to install it through Joomla Administration Area. In order to do that, please, choose the Installers -> Components menu.
After installing the component you should navigate to Components -> Galley2 -> Settings and enter the paths to your Gallery2 script. The other option is to use the installation wizard.

Read more...

Joomla and Google AdSense

Joomla and Google AdSense
How to install Google AdSense module on your Joomla website?

If you would like to use Google AdSense on your Joomla site you would have to add some functionality to your Joomla Administration tool.

First of all you need to download the necessary module. You can find and download Google Adsense Module from here:

Download Google Adsense Module

Please, save it on your local drive, from where you can upload it to your Joomla site later on. As you can see, the application is a Module, so, you need to upload it from your Module menu. Please select Installer -> Modules from your Main Menu.
Browse through your files and find the folder with the Adsense Module and press Upload File and Install.Now you can see the new Module in your Modules -> Site Modules list. Next, please select Site Modules from your Modules menu:
Find the Google Adsense Module link (please note it could be on your 2nd page) and click it. Here you need to enter you Google AdSense data so that you are able to display Google Ads on your Joomla site.

When you point the mouse cursor over a parameter an Info section pops up and explains the parameter meaning.
Please, take the necessary data from your Google Adsense html code.

Well done! You have successfully installed the Google AdSense Module on your Joomla site.

Read more...

Thursday, March 5, 2009

Joomla and Calendar Extension

Joomla and Calendar Extension
How to install Events Calendar component and module?

For a Calendar solution, we choose the Events Calendar Joomla addon. To install this addon please follow the instructions below:

Step 1: Download the Calendar Component and Module

The needed packages can be download from:

http://extensions.joomla.org/component/option,com_mtree/task,viewlink/link_id,95/Itemid,35/
You should use the download link than choose the latest versions for com_events and mod_events available on the page.

Step 2: Install Calendar Component (com_)

Install the .zip package of the component from the administrator panel of you Joomla. From the menu, you should choose Installers -> Components

Next, please, click the [Browse] button and navigate to the downloaded .zip archive. Open it and click the [Upload File & Install] button. Step 3: Install Calendar Module (mod_)

Install the .zip package of the module from the administrator panel of you Joomla. Please, navigate to Installers -> Modules from the top menu.Then click the [Browse] button and navigate to the downloaded .zip archive. Open it and click the [Upload File & Install] button.

Well done! The calendar module can now be published via Modules -> Site Modules
It will be listed there as Latest Events

Read more...

Tuesday, March 3, 2009

Joomla and SMF Forum

How to install SMF Forum component on your Joomla website

There are several Joomla-SMF integration solutions, integrations independently developed on the net. SiteGround's servers are perfectly set to ensure all of them work properly.

In this tutorial we will cover the most popular one which is distributed by Joomlahacks:

http://www.joomlahacks.com/joomla/components/Joomla-SMF_Forum/

Please follow these steps in order to install the component properly.

Step 1: Download Joomla's configuration.php file via FTP. It can be found in Joomla main directory. Open it with Notepad or another editor. Find and copy the following rows:

$mosConfig_db = 'username_joomla';
$mosConfig_password = 'yours';
$mosConfig_user = 'username_joomla';

The information in the quotes will be different on your site -

$mosConfig_db determines your Joomla database.
$mosConfig_password determines which is the password for your Joomla's database user.
$mosConfig_user determines which is your Joomla's database user.

The above information will be used when installing the SMF forum in the next steps.

Step 2: Follow the tutorial to install manually SMF forum in a subdirectory on your site. In this example we will call it forum, i.e. http://www.yourdomain.tld/forum.

* Upload and extract the forum's files
* Skip the step for setting up a new database because we will be using Joomla's database
* Follow the web installation instructions for specifying the correct details. Make sure to specify the database details from the Joomla file as described in Step 1.

Step 3: Register to Joomlahacks in order to be able to download the Joomla-SMF component.

Step 4: Install the Joomla-SMF component

Please, log in your Joomla admin panel and go to Installers -> Components:
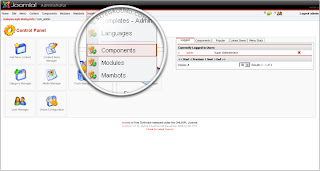
Browse for the com_joomla_smf_forum_x.x.zip file you have previously downloaded and press the [Upload file and Install] button: Step 5: Joomla-SMF configuration.

All that is left now is to configure the Joomla-SMF component. Please, Go to Components -> Joomla SMF Forum -> Configuration:This is the most important step of the integration, and is essential that you complete all fields correctly:

Joomla-SMF configuration details:

* SMF Absolute Path - the path where you installed SMF. You can use the path to the Joomla installation as reference. In our case it will be forum.
* SMF Database Prefix - the default prefix is smf_. This should not be changed by default.

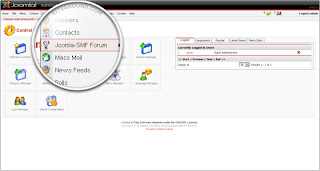
Fill in the above two and click on the [Save] button. Fix the errors, if any, and proceed by clicking on the click to patch links for the index files of Joomla and SMF. Clicking on the [Save] button after each change will help you avoid errors, and make it easier to revert wrong actions.

After completing all steps successfully, the SMF forum should work fine in your Joomla-based website. Well done!

Read more...

Followers

Text

  ©Template by Dicas Blogger.