Wednesday, February 25, 2009

Install Joomla CMS manually

How to allinstall Joomla CMS manually

You can follow these instructions if you want to perform a manual installation of Joomla for your web site.
Pre-installation Steps

Step 1: Database setup

In order to use Joomla, you would need to create a MySQL database and a user with all the necessary priviledges to access the database. Please, check our tutorial on how to create MySQL database and user for more information on that matter. It is adviseable to create the database and the username with the same name in order to avoid any confusion in the future (for example you can choose username_joomla for both).

Step 2: Upload the installation files

You have to upload the Joomla installation files to your web hosting account. You can download the latest release from the official Joomla web site.

The downloaded archive should be extracted locally on your computer. Once this is completed, the files should be uploaded to your web hosting account. In order to do so you can use an FTP client. For detailed information on that matter please check our FTP tutorial.

Please note that if you would like the Joomla installation performed for your domain name thus making it accessible at http://www.your-domain.com, the installation files should be uploaded directly under the public_html folder for your account. If you would like the installation perfromed in a sub-folder or for a sub-domain name the files should be uploaded in the corresponding directory located under the public_html folder.For example if you would like the installation performed for: http://www.your-domain.com/joomla, the installation files should be uploaded under public_html/joomla.
Installation

Pre-installation checks:

In this step the Joomla installer checks the server configuration and verifies all the settings needed for the installation. Generally on all Joomla-optimized servers all the checks should be passed without any troubles and the status will be marked in green.If any custom settings are enabled for your account this might interfere with the Joomla installation. In such case the pre-installation check will notify you exactly which requirement is not met, the status will be marked in red and if available more information will be displayed. If so the issue must be resolved and the check run again.

Once all checks are successfully passed you can proceed with the installation by clicking the [Next] button.

GNU/GPL License agreement.

Please go through the Joomla GNU/GPL License. Any terms, conditions and rules for using a Joomla installation are listed there. After you have checked it you can continue to the installation by clicking the [Next] button.

Step 1: MySQL database configuration

You should have already created the needed MySQL database and username added to it in Step 1 of the pre-installation instructions. The details should be entered in the corresponding boxes.

Note, that the names of the database and the user are prefixed with "username_" where username is your cPanel login name.

Do not forget to type in the password of the MySQL user and note that it is case-sensitive.

For Host Name you should use localhost.All other check-boxes and fields can be left to the default ones.Click on [Next] and a popup will appear, asking you to confirm that the information you entered is correct.If you made a mistake, you will be taken back to this page to correct it.
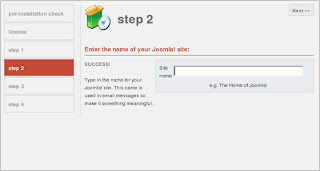
Step 2: Site Name.

In this step you should choose the desired name for your web site. It will be displayed on the top of the web browser when your web site is accessed and will be used in e-mail messages sent from your Joomla installation. Note that this can be alterred later from the administrator back-end.
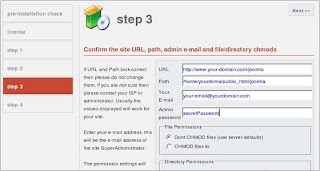
Step 3: Confirm the site URL, path, admin e-mail and file/directory chmods

This is an important part of the installation, where you are asked to confirm the URL and system path to the files as well as the permissions you would like set for them. It is highly adviseable not to change the options that were automatically generated and leave them as they are. Also it will be best to supply a valid email address. Of course the administrative password can be changed to a desired one.
Step 4: Completing the installation

Before you can access it, you have to delete the directory called "installation" that is located inside the Joomla directory. This can be done using either an FTP client or cPanel's File Manager.
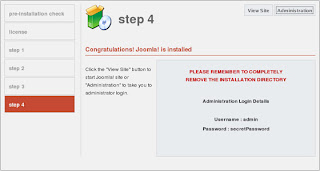
You will be provided with the administrative login details for your Joomla installation in this screen. You will be able to click the [View Site] button to access your new Joomla site or [Administration] to take you to administrator login.

Well done! You have successfully installed the Joomla! system on your website!


Read more...

Joomla Administration - Global Configuration Site, Locale, Content

Now we can proceed to tuning your Joomla, including changing the default language. In your administrator's panel visit Site - > Global Configuration.

In the first Site tab you can:

* make your website unavailable to the public while it is still in development
* change the offline message;
* choose a Site Name (Company Name) for your website - that would be the
* change the default HTML editor, and
* the number of items in each list.
The Locale tab allows you to:

* specify locale different from the default one;
* change the TimeZone settings. Siteground's servers are set in CDT (Central Daylight Time) and you might wish to adjust it to yours.
* select the language that the site will display - it can be picked up amongst the ones already installed and published language packs on your Joomla system.

In the Content tab you can choose whether to display the printer-friendly version link in your content.

For those of the options that sound unfamiliar to you, additional information can be obtained when hovering with the mouse pointer over the blue 'i' circle at the end of each row.

If you have to change the database setting, you can do this in the Database tab. The server, database name, user and password can be edited from that tab.

Please, find below information about the other options in the Global configuration tab:

* Meta data, Mail, Stats
* Search Engine Friendly URLs

Read more...

Joomla Languages

Joomla Languages

When you enter the administration panel, you will first see the index page with all management options.If you'd like to add a new language pack to your Joomla installation, please, visit the Joomla Extentions - Languages page and download the language pack of your choice. Then, please go to the Installers menu and select Languages.Press the [Browse] button to locate the installation pack for your language...

Now you have successfully installed a new language pack on your Joomla system.

Next we will set it as default. For this purpose please go to Joomla's admin panel: Global Configuration -> Site, the Locale tab. In the Language option choose the newly installed one and this will automatically set it as default for your site.

Well done! You have successfully changed the language the default language of your Joomla!

Read more...

Joomla Templates

Joomla Templates

SiteGround web hosting has released great-looking Joomla templates for personal and business sites, which you can download and use FREE of charge! Get FREE installation of Joomla templates with the SiteGround Joomla hosting package!
How to install and change Joomla Templates?

Installing a template on Joomla is an easy task. The first thing you have to do is to find the template of your choice and download it. SiteGround's FREE Joomla Templates Gallery is a good place to look at. The template file is a zip archive (a.k.a. package file) containing everything needed for its installation. To install it, please, log in to your Joomla administrator panel and go to Installers -> Templates – Site.
Click on the [Browse...] button, select the .zip file of the template you downloaded and click on [Upload file & Install]The upload should complete in few seconds. Then click on Continiue...

You are now taken to the Template Manager section of the Joomla administration panel. We assume you'd like to have the newly installed template set as default for your site. To make this happen select the radio button just in front of its name and click on the [Default] button, at the top bar of the page.
Your site now uses the newly installed template. Go to your site and enjoy it :)

Read more...

About Joomla

oomla 1.0.x Tutorial Bookshelf

This set of tutorials shows how to install a complete Joomla site. Screenshots are provided for each step.

The tutorials illustrate the installation using a Windows XP desktop and a Unix web server. Since the desktop is only used for transfering and editing files, and most of the actual setup takes place in a browser, these tutorials should be useful for users of other operating systems than Windows, since the operations will be similar.

The tutorials can be viewed in any modern browser. Javascript is required for some functions, such as search.

The tutorials are meant to provide step by step instruction for beginners, although there are a few basic prerequisites:

1. Readers should understand basic computer functions including how to download and install software
2. Readers should understand what a computer file is, and how to copy and delete files
3. Readers should have at least a very basic understanding of what HTML is.

Number #2 seems to be a stumbling block for many computer users who have picked up computer knowledge without any formal training. If you don't know exactly what a computer file is, check out this set of computer beginner tutorials. Knowing the basics of files makes a lot of other computer knowledge much easier to understand.
These tutorials are created with a program called "Screenbook Maker". The tutorials all have a common format called the Screenbook format. Computer tasks are explained via short text descriptions and graphic "snapshots" of the full computer screen - "screenshots".

The screenshots are of screens at different resolutions, but all are displayed with a height of 640 and width of 480 pixels. If you are using Internet Explorer, you can click on "style" in the menubar at the top of the tutorial page, and change the image size. It is recommended that you make the image as large as will fit on your monitor.

If you are using Firefox or another browser, images which were originally larger than 640 x 480 will appear somewhat unclear, because of resizing. Internet Explorer contains a component that can resize screen images without causing a lack of clarity, but this feature doesn't exist yet in other browsers. However, in browser other than Internet Explorer, you'll notice a link under each image that you can click to see the image full sized.

Other items on the tutorial menubar include buttons for moving to the next or previous page, and

* search : quick full text search of all of the tutorials in this "bookshelf". A bookshelf is a set of screenbooks.
* square icon : view this page without frames
* bookshelf : table of contents for the bookshelf (in a frame)
* titles : menu of page titles for the screenbook
* all : all pages of the current tutorial combined on to one page
* thumbnails : thumbnail images with page titles

Read more...

Joomla Installation

Joomla Installation
Get a FREE Joomla installation with SiteGround Joomla hosting Package!

There are two ways to install Joomla on your SiteGround hosting account. The easiest and preferred method is through the Fantastico tool in your cPanel. It requires no technical skills and your Joomla website will be set after just few clicks.

On the other hand you can install Joomla manually. This method is preferred by advanced users who want to follow closely the installation process and make any customizations right away.If you feel comfortable with FTP, and have basic understanding of file permissions, databases and web technologies as a whole, you can install Joomla manually.
How to install Joomla with Fantastico

In order to install Joomla with Fantastico, please log into your cPanel and click on the blue smiley icon () at the bottom of the page.

Please, select ‘Joomla’ from the menu list on the left-hand side
and click on New Installation
Form explanation:

* Install in Directory - this determines the address where your Joomla installation will be accessible at. If you want to use Joomla for your home page, just leave this field blank.
* Admin access data - the username and password for accessing the administration panel of your Joomla installation.
* Base Configuration Admin e-mail - your e-mail address
* Admin full name - your full name
* Site Name - the name of your website that will be displayed on the front page

Once you have filled in the form, please proceed by clicking on the "Install Joomla" button. You will be asked to confirm the installation on the next page. Finally, you get a page that informs you of a successful installation. You should bookmark the address of the administrator panel (yourdomain.com/administrator), and note your login credentials.

Well done! You are now ready to log in and start building your website!

Read more...

Followers

Text

  ©Template by Dicas Blogger.